Setting up the Teams API in Microsoft 365 (Microsoft Teams)
In this guide, we will show you how to set up the Teams API to use Microsoft Teams as a virtual location (Virtual Classroom Type: Microsoft Teams) in Avendoo.
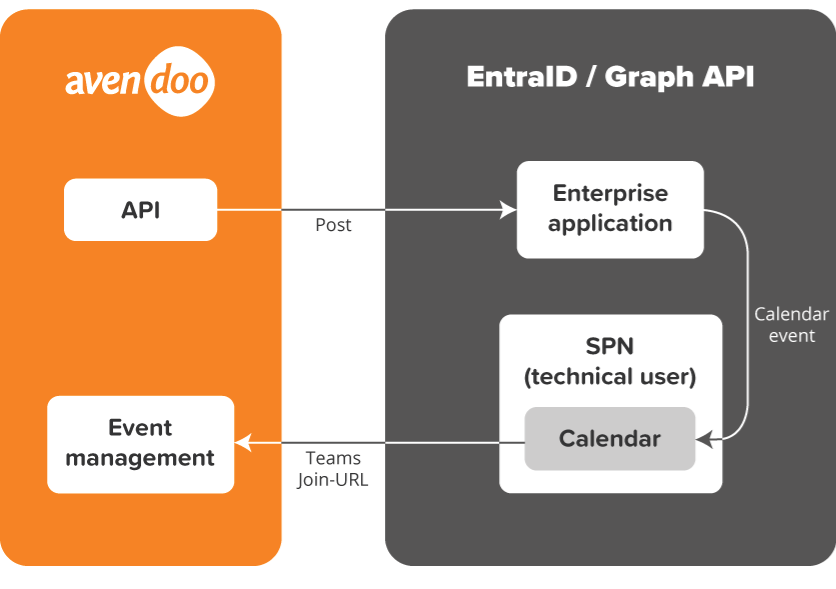
Prerequisites
You need administrative rights in Microsoft 365 for:
- Creation of mailboxes
- Creation of enterprise applications in Entra ID
- Creation of Client Secrets in App registrations
- Access Exchange Online via PowerShell (module: ExchangeOnlineManagement)
Additionally, you need:
- A mailbox that is located in the cloud and can be accessed via API
- A Teams license so that the user can also set up Teams meetings
- The Calender.ReadWrite application right is assigned in the configuration and restricted to the specified mailbox.
Setting up the Apps in Microsoft 365
1
Create a new enterprise application (not from the gallery).
2
In the properties, set the user visibility to No.
3
Assign an owner and make a note of the application ID and object ID. These will be required later in Powershell.
4
Go to App registrations. There you will find a registration with the name you assigned previously. On the overview page, note down the following values, which are required for configuration in Avendoo.
- Tenant ID
- Application ID
5
Go to Certificates & secrets. There, create a new Client Secret (“secret”). We recommend a validity of two years. However, a shorter validity can also be chosen.
Note: Note down the expiration date of the Client Secret to renew it in time.
6
Note down the value. The ID is not required.
Note: The value is only readable now. After leaving the page, it can no longer be retrieved.
Granting Permissions in Microsoft 365
RBAC is used for applications to grant authorisations. Further information can be found in the following article: https://learn.microsoft.com/en-us/exchange/permissions-exo/application-rbac
Note: We recommend assigning and securing rights as described in the article. We cannot guarantee that the Microsoft instructions are up to date. As a customer, you are responsible for securing your data.
1
Connect to Exchange Online via PowerShell Connect-ExchangeOnline
2
Create a ServicePrincipal for the enterprise application
New-ServicePrincipal -AppId <application ID (business application)> -ObjectId <object ID (business application)> -DisplayName <Assign a name>
3
Create a ManagementScope that points to the mailbox user.
New-ManagementScope -Name <Assign a name> -RecipientRestrictionFilter „PrimarySmtpAddress -eq <Primary SMTP address>“
4
Assign the required right Calender.ReadWrite.
New-ManagementRoleAssignment -Role „Application Calender.ReadWrite“ -App <Application ID (business application)> -CustomResourceScope <Assigned designation from ManagementScope>
5
You can display the assigned rights/roles of the enterprise application as follows:
Test-ServicePrincipalAuthorization -Identity <Assigned name from the ServicePrincipal> | Format-Table
Granting rights in Microsoft 365 can take some time. In most cases, however, they take effect after an hour. However, this time can also be significantly longer.
You can now create a new virtual location of Virtual Classroom Type “Microsoft Teams – Online Meeting” in Avendoo.